- 1Share
Featured image credit: Stylecraze.com
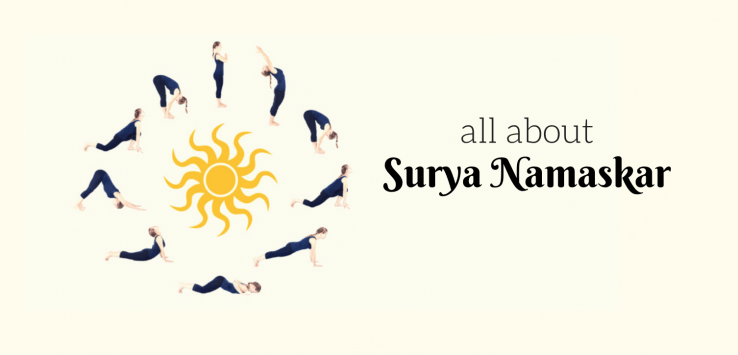
It’s yoga month! We begin our series of articles dedicated to the wonderful science of yoga with Surya Namaskar.
In the ancient tradition of yoga, “Surya” or the Sun has been a symbol of spiritual consciousness, vitality, dynamism and glory. Translating to “Sun salutation”, Surya Namaskar is a special way to thank the Sun for showering its life-giving energy on us – while at the same time, drawing in the Sun’s energy and getting a powerful workout for the body and mind. Each Sun salutation sequence has 8 poses that make up 12 steps. It’s best done early in the morning on an empty stomach. However, you can also do it at Sunset.
The best part? It leaves you feeling energetic, mentally clear and positive throughout the day. You’re likely to feel the difference in a matter of a weeks, or even days!
Benefits of Surya Namaskar:
- Strengthens the muscles and joints
- Makes the spine more flexible
- Brings glowing skin
- Improves digestion
- Calms the mind
- Regulates menstrual cycle
- Lowers blood sugar
- Helps you lose weight
- Detoxifies the body
- Increases energy levels
The 12 Poses of Surya Namaskar
Step 1: Prayer pose (Pranamasana)
- Begin by standing straight with your feet together and hands on your side. Distribute your body weight evenly on your feet.
- Gently bring join your palms in front of your chest and close your eyes. This forms the “namaskar” mudra.
Step 2: Raised Arms pose (Hastottanasana)
- Inhaling, slowly raise your arms above your head and slightly bend your trunk backwards.
- Move only your trunk, not the hips.
Step 3: Hand to Foot pose (Padahastasana)
- Exhaling, bend forward from the waist until your fingers touch your toes.
- Touch your head to your knees.
Step 4: Equestrian pose (Ashwanchalanasana)
- Inhaling, raise your head up and arch your back backwards.
- Simultaneously, place your hands on the mat and move your right leg behind.
- Bend your knee and rest it on the mat.
- For a better arch, move your butt lower.
Step 5: Mountain pose (Parvatasana)
- Exhaling, move the right foot back on the mat – without bending your knee this time. Your body weight should rest on your palms and feet without knees bent. Touch the back of your heels on the mat.
- Simultaneously, raise your hips up and move your head down, looking at your navel.
- Align your feet with your palms.
Step 6: Salute With Eight Points (Ashtanga Namaskara)
- Suspending the breath, lower your knees, chest and chin to touch the mat.
- Your hips should be in the air. The other parts – toes, knees, chest, hands and chin, should touch the mat.
Step 7: Cobra Pose (Bhujangasana)
- Now, lower your hips to mat too, bringing your pelvis in contact with the floor.
- Inhaling, raise your head and arch your back until the hands are fully straightened up.
Step 8: Mountain pose (Parvatasana)
- Breathe out and lower your trunk to the floor.
- Push your whole body backwards raising your hips and straightening the arms.
- You should be in the same posture as in step 5.
Step 9: Equestrian pose (Ashwanchalanasana)
- Inhaling, move your left foot ahead with the knee bent and the foot between your palms.
Step 10: Hand to Foot pose (Padahastasana)
- Exhaling, bring the right leg to the side of the left one.
- Stand up while keeping your palms flat on the floor. Your trunk should still stay bent, only the must will be straight.
- Bring your head to the knees.
- You should be in the same pose as in step 3.
Step 11: Raised Arms pose (Hastottanasana)
- Inhaling, raise both your arms above your head and bring your trunk up.
- Standing straight, bend your trunk backwards with arms still raised.
Step 12: Prayer pose (Pranamasana)
- Exhaling, move your trunk back ahead until you stand straight.
- Bring your hands down and join your palms in front of your chest.
End with Savasana.
Avoid Surya Namaskar if You Have:
- High body weakness
- Bad ailments or injuries
- Pregnant women
- High blood pressure
- Heart problems
- Arthritis
- Wrist injury
Finally…
Remember to never strain yourself. If your toes don’t touch the floor, take them to any point of your legs that feel comfortable. If your head cannot touch your knees, go as far as you can. Never jerk your body and go easy on yourself. We highly recommend these Surya Namaskar steps first the supervision of a trained yoga teacher, and then at home.
Leave a Reply